
Is your Toyota Camry running rough or is it experiencing a drop in fuel efficiency? If so, it could be due to a faulty Mass Airflow Sensor (MAF). The MAF is an essential part of your car’s engine management system that measures the amount of air entering the engine to ensure proper fuel delivery. In this blog, we will provide you with a step-by-step guide on how to replace a Toyota Camry MAF sensor.
We will also discuss the symptoms of a faulty MAF and safety precautions required before replacing the sensor. Our comprehensive guide will help you identify the tools needed and tips and tricks for successful replacement. Additionally, we will cover post-installation checks and how to test drive your vehicle to ensure everything is working correctly.
Introduction to Mass Airflow Sensor (MAF)
The mass airflow sensor (MAF) is a crucial component of the Toyota Camry’s engine. It measures the amount of air entering the engine and provides vital information to the car’s computer system, which determines the correct fuel-to-air ratio for optimal performance. If your Toyota Camry is experiencing poor acceleration, rough idling, or decreased fuel efficiency, it may be time to replace the MAF sensor.
It is important to use a high-quality replacement sensor that meets manufacturer specifications and instructions. Replacing the MAF sensor requires careful removal of the old one and proper installation of the new one. After installation, testing the new sensor is crucial to ensure proper functioning of your vehicle. Follow this step-by-step guide to replace your Toyota Camry’s MAF sensor with confidence.
Symptoms of a Faulty MAF Sensor in Toyota Camry
A Toyota Camry’s Mass Airflow Sensor (MAF) plays a vital role in monitoring and regulating the amount of air entering the engine. A faulty MAF sensor can cause several symptoms such as decreased fuel efficiency, poor acceleration, stalling, or difficulty starting the engine, rough idling or hesitation during acceleration, unusual sounds coming from the engine, and illumination of the check engine light.
If you experience any of these symptoms, it may be time to replace your MAF sensor. Also, replacing the MAF sensor as part of routine maintenance can help prevent these symptoms from occurring in the first place. Follow our step-by-step guide to replace your Toyota Camry’s MAF sensor and get back on the road with a smooth-running engine.
Preparing for Replacement
Replacing a Toyota Camry mass airflow sensor is a simple process that requires a few essential tools and replacement parts. Before you begin the replacement, park your vehicle on a flat surface and turn off the engine. It is also recommended that you disconnect the battery to avoid any electrical accidents.
The mass airflow sensor is usually located under the hood of your car, close to the air filter box. Once you have found it, carefully remove it and take note of how it’s installed so you can put in the new one correctly. Before installing the new sensor, make sure the area around it is clean to ensure proper functioning. With careful installation and following these steps, you can replace your Toyota Camry mass airflow sensor with ease.
Tools Required
Replacing a Toyota Camry Mass Airflow Sensor requires a set of basic tools that you should have on hand before starting the replacement process. Some essential tools required include a socket wrench, screwdriver, pliers, and wire cutters. In addition, you may need to wear gloves and safety glasses to protect yourself during the process.
Make sure that you have all the necessary tools before starting the replacement process to avoid any interruptions. Having everything at your fingertips will help ensure that the replacement process goes smoothly and efficiently. With the right tools and a little bit of know-how, replacing your Toyota Camry Mass Airflow Sensor can be a straightforward task that will help keep your vehicle running smoothly.
Safety Precautions
Before beginning the process of replacing the mass airflow sensor in your Toyota Camry, it is important to take some safety precautions. Firstly, disconnect the battery and wait for 10-15 minutes to ensure that all electrical charges are dissipated. When handling the sensor, make sure to wear gloves and safety glasses to prevent any injury.
It’s crucial to avoid touching the sensing element of the new mass airflow sensor with your fingers as it can cause damage. Taking time to clean the area around the sensor before removing it will help avoid debris from falling into your engine. Lastly, always follow the manufacturer’s instructions carefully when installing the new sensor to ensure proper installation and functionality. By taking these necessary precautions, you can successfully replace your Toyota Camry mass airflow sensor while minimizing potential problems or hazards.
Step-by-Step Guide to Replace a Toyota Camry Mass Airflow Sensor
Replacing the mass airflow sensor in a Toyota Camry can be a daunting task, but it can be done with some basic knowledge and the right tools. Before starting, gather all the necessary tools and equipment required for the job. Locate the mass airflow sensor in your Toyota Camry and remove it carefully. Ensure that you install the new mass airflow sensor in the correct position using the instructions provided by the manufacturer.
Once you have installed the new mass airflow sensor, test your Toyota Camry to ensure proper installation and functionality of the new part. If everything is working correctly, then you have successfully replaced your Toyota Camry’s mass airflow sensor.
Locate the Mass Airflow Sensor
If you need to replace the Mass Airflow Sensor on your Toyota Camry, don’t worry – it’s a relatively straightforward process. The first step is to locate the sensor, which is typically near the air filter housing and connected to the intake hose. Depending on your particular model, you may need to remove other components such as the air filter box or battery to access it.
Before getting started, be sure to disconnect the negative battery cable to ensure your safety while working with electrical components. Once you’ve located the Mass Airflow Sensor, carefully detach the electrical connector and loosen any screws or bolts holding it in place.
With the old sensor removed, it’s time to install the new one. Make sure everything is securely fastened and reattach any components that were removed during the process. Following these steps will ensure that your Toyota Camry runs smoothly with a properly functioning Mass Airflow Sensor.
Disconnect the Electrical Connector
When replacing the mass airflow sensor on your Toyota Camry, it’s important to first disconnect the battery to prevent any electrical shock. Once you have done so, locate the sensor under the hood of your car. Removing the electrical connector that connects the sensor to the wiring harness is an important step in this process.
To do so, press down on the locking tab and gently pull it off. It’s essential to be careful while removing this connector as it can be fragile. In case you face any resistance while removing, use a screwdriver to gently pry it off. Following these steps will ensure a successful replacement of your Toyota Camry Mass Airflow Sensor.
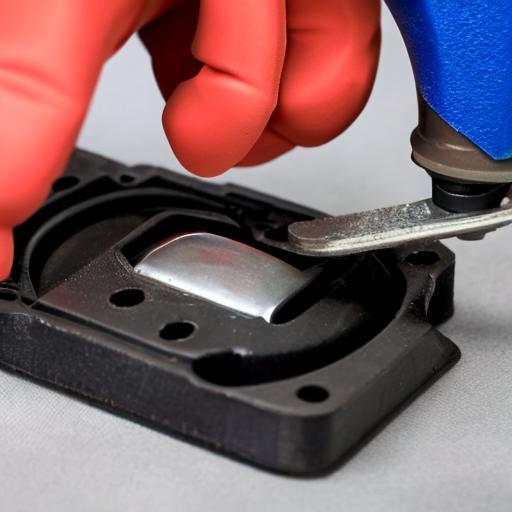
Remove the MAF Sensor Screws
When replacing a Toyota Camry Mass Airflow Sensor, it’s important to follow a step-by-step guide. Before removing the MAF sensor screws, disconnect the negative battery cable to avoid any electrical issues. The MAF sensor is typically attached to the air intake hose, and you can use a screwdriver or socket wrench to carefully remove the screws that hold it in place. Keep track of any small parts that may come loose during removal.
Once the screws are removed, gently pull out the MAF sensor from its housing. It’s important to be gentle during this process to avoid damaging any of the surrounding components. With your old MAF sensor removed, you can now proceed with installing your new one. Following these steps will ensure a smooth replacement process for your Toyota Camry Mass Airflow Sensor.
Remove the Old MAF Sensor
Replacing a Toyota Camry Mass Airflow Sensor can seem like a daunting task, but with this step-by-step guide, it can be done quickly and easily. The first step is to locate the MAF sensor in the air intake system of your vehicle. Before removing the old sensor, it’s important to disconnect the negative battery cable to avoid any electrical damage.
Once you’ve disconnected the battery, use a socket wrench or pliers to remove any clamps or screws holding the old sensor in place. Carefully remove the old sensor from its housing, taking note of its orientation for proper installation of the new one. Before disposing of the old sensor, inspect it for any signs of damage or wear.
By following these steps, you’ll be able to successfully remove and replace your Toyota Camry’s MAF sensor with ease. Remember to always take precautions when working with electrical components and dispose of the old sensor properly.
Install the New MAF Sensor
Replacing a Toyota Camry Mass Airflow Sensor can be done with this step-by-step guide. Once the old sensor has been carefully removed to avoid damaging any of the components, the new MAF sensor must be aligned with its mounting bracket and properly secured in place.
It’s important to connect the electrical connector snugly and reconnect any hoses or ductwork that were removed during the process. Finally, start your Toyota Camry and let it run for a few minutes to ensure that the new MAF sensor is working correctly. By following these steps, you can replace your Toyota Camry’s MAF sensor with ease and confidence.
Reconnect the Electrical Connector
When replacing the Mass Airflow Sensor in your Toyota Camry, it’s crucial to pay attention to the electrical connector. This component is essential for proper functioning of the sensor and must be properly connected. Make sure that the connector snaps into place and is secured tightly. Double-check the wiring to ensure all connections are secure and tight.
After connecting the electrical components, you should reconnect the battery and start your car to make sure that your new sensor is working correctly. Taking these steps will ensure a successful replacement of your Toyota Camry Mass Airflow Sensor, allowing for optimal performance of your vehicle.
Tips and Tricks for MAF Replacement in Toyota Camry
Replacing the Mass Airflow Sensor (MAF) is an important part of maintaining a Toyota Camry. Before you begin the replacement process, gather all the necessary tools and materials. Disconnecting the battery is vital to avoid any electrical mishaps during the replacement process.
Locating the MAF sensor in your Toyota Camry is crucial. Once found, carefully remove the old MAF sensor and then install the new one ensuring that all connections are secure. After installation, clear any error codes with a scan tool and take your vehicle on a test drive to ensure proper functioning of the new MAF sensor. These tips and tricks will make replacing your Toyota Camry’s MAF sensor an easy task!
Test Drive and Post Installation Checks
After replacing the Toyota Camry mass airflow sensor, it’s crucial to take the car for a test drive. This will ensure that the new sensor is functioning correctly and that there are no warning lights or error messages on the dashboard. You should monitor the car’s acceleration and idling performance before closing the hood.
It’s important to re-check all connections and ensure they are secure before you do so. Additionally, consider getting a professional diagnostic test done to confirm that the replacement was successful. By following these simple steps, you can effectively replace your Toyota Camry mass airflow sensor and keep your vehicle running smoothly.
FAQS: How to replace mass air flow sensor toyota camry
How do I reset my car after replacing the MAF sensor?
In order to reset your car after replacing the MAF (Mass Airflow Sensor) sensor, you will need to follow a few steps. First, disconnect the negative battery cable from your car’s battery. This will reset the car’s computer and clear any codes that may have been stored. Next, locate the MAF sensor on your car and remove it.
Install the new MAF sensor in its place and reconnect any wires or hoses that were disconnected during the installation process. Finally, reconnect the negative battery cable to the battery and start your car. The computer will automatically recalibrate itself with the new sensor, but it may take some time for it to adjust fully. It is also a good idea to drive your car for a short distance after replacing the MAF sensor to ensure that everything is working properly.
Can I replace my own MAF sensor?
It is possible for some individuals with experience and knowledge in car repairs to replace their own MAF sensor. However, it is important to note that replacing a MAF sensor can be complex and require specialized tools and equipment.
It is also important to ensure that the replacement sensor is compatible with your specific vehicle make and model. If you are unsure about your ability to replace the MAF sensor on your own, it may be best to consult with a professional mechanic or technician who can provide guidance and assistance.
Where is the mass air flow sensor on a Toyota Camry?
A Toyota Camry’s mass air flow sensor is typically located between the air filter housing and the engine intake manifold. However, the exact location may vary depending on your Camry’s specific year and model. To locate the sensor, you can consult your vehicle’s owner manual or perform an online search for the location specific to your Camry’s make and model.
Once you have located the sensor, handling it carefully and avoiding damaging any of its delicate components during cleaning or replacement is important. Suppose you are unsure about how to proceed with servicing your vehicle’s mass air flow sensor. In that case, it may be best to consult a professional mechanic or technician with experience working with Toyota vehicles.
What is a mass airflow sensor and what does it do in a Toyota Camry?
A mass airflow sensor measures the amount of air entering the engine and, in a Toyota Camry, it sends data to the engine control module to adjust fuel injection and ignition timing. If the sensor is faulty or dirty, it can negatively impact engine performance and fuel efficiency. Replacing a faulty mass airflow sensor can improve overall performance of the engine in a Toyota Camry.
What are some signs that my Toyota Camry’s mass airflow sensor needs to be replaced?
If you’re driving a Toyota Camry, signs that its mass airflow sensor needs to be replaced include decreased fuel efficiency, rough idling, a check engine light, stalling, or hesitation while driving. If you notice any of these symptoms, it is best to have the mass airflow sensor checked by a qualified mechanic. Replacing a faulty mass airflow sensor can improve your vehicle’s performance and save you money in the long run.
What tools and equipment do I need to replace the mass airflow sensor in my Toyota Camry?
To replace the mass airflow sensor in your Toyota Camry, you will need a new sensor, as well as a screwdriver, pliers, and a socket wrench set. Before starting the replacement process, be sure to disconnect the battery to avoid any electrical issues.
For specific details on the replacement process, refer to the manufacturer’s instructions or a reliable guide to ensure that you complete the replacement correctly and safely.
Are there any specific steps or precautions I should take when replacing the mass airflow sensor?
When replacing the mass airflow sensor, you should take a few specific steps and precautions. First, make sure to disconnect the negative battery cable before beginning the replacement process. Next, handle the new sensor with care and avoid touching the sensing element. Use a torque wrench to tighten all screws and bolts to the manufacturer’s specifications.
After installation, it is important to clear any error codes using an OBD-II scanner to ensure proper functioning of the system. Following these steps can help ensure a successful replacement process and optimal vehicle performance.
Conclusion
Replacing a Toyota Camry Mass Airflow Sensor is not as complicated as it might seem. By following the step-by-step guide in this blog, you can easily replace your MAF sensor without the help of a mechanic. However, following all safety precautions and using the right tools for the job is essential.
After installation, take your car for a test drive and perform post-installation checks to ensure everything works fine. Do you still have questions about replacing a Toyota Camry Mass Airflow Sensor? Check out our website for more tips and tricks on how to maintain your vehicle or get in touch with our experts today.